Razor View Engine
This post is part of the series I’m doing on the newly released ASP.NET MVC 3.
If you install MVC 3 one of the first things you’ll notice is that there is a new project template for MVC 3. If you choose this template you will be presented with a menu where you can choose the type of project you want to create (basically just whether or not you want the Forms Authentication template code included) and also which view engine you want to use.

MVC has always supported the concept of view engines – pluggable modules that support different syntax templates. Pretty much everyone uses the default view engine (the angle brackets have become synonymous with ASP.NET), but there are a few popular alternatives such as Spark and NHaml. I have also written my own one called Sharpy.
How is it used
In my last post I used the planets in our solar system as an example so I’m going to extend that example to illustrate how Razor works. Let’s take a look at a simple snippet of Razor syntax.
<h2>@Model.Name</h2>

<p>Distance from the Sun: @Model.Distance (AU)</p>
<p>Number of Satellites: @Model.NumberOfSatellites</p>
<p>@Model.Description</p>
The Razor syntax is incredibly easy to get used to – after a few minutes of playing around it felt like second nature. In this code snippet we’re simply grabbing a few properties from the Model (I’m using a strongly-typed view here – yes, it’s still available with Razor), but what about something more complex?
<h2>The planets in our Solar System</h2>

<ul>
@foreach(var p in Model) {
    <li>@Html.ActionLink(p.Name, "Index", new { p.Id })</li>
}
</ul>
For loops, if statements – pretty much everything you’re used to with the normal view engine is there. What if you simply want to declare a block of code?
@{
    var description = Model.Description;
    var length = description.Length;
}
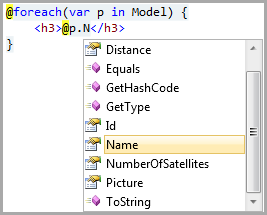
It’s mostly pretty intuitive. Visual Studio now also supports Intellisense for Razor (this is a feature that was left out with the preview version of MVC 3).

The biggest adjustment for someone used to the normal view engine is probably not the syntax, but the way master pages work with Razor. Instead of master pages Razor uses layouts.
<!DOCTYPE html>
<html>
<head>
    <title>@ViewBag.Title</title>
    <link href="@Url.Content("~/Content/Site.css")" rel="stylesheet" type="text/css" />
</head>

<body>
    @RenderBody()

    <p>All images and information Courtesy of <a href="http://www.wikipedia.org/">Wikipedia</a></p>
</body>

<script src="@Url.Content("~/Scripts/jquery-1.4.4.min.js")" type="text/javascript"></script><br />@RenderSection("Scripts", false)

</html>
So basically instead of declaring sections in the master page and having the views declare their code in matching sections, the layout will inject the entire view where the layout calls the RenderBody method.
This is not to say we can’t have sections like we do in the normal view engine. For example, we might want to have a section at the bottom of the page where we can do JavaScript includes which are specific to the view. (We all put our JavaScript includes at the bottom of the page, right?) I have already declare a section called ‘Scripts’ in my layout, so in the view I simply need to do the following.
@section Scripts {
    <script src="@Url.Content("~/Scripts/details.js")" type="text/javascript"></script>
}
The ViewBag (not to be confused with ViewData) is a dynamic object which is available to all the views – the view will be evaluated before the layout which means any data set on the ViewBag will be available in the layout, but not the other way round.
How to do this in MVC 2
So how would we do this in MVC 2? Obviously Razor is not available in MVC 2 so we would need to use the default view engine. This is not really a drawback, since there is nothing the Razor view engine can do that we can’t do with the default view engine. Simply replace our layout with a master page and add some angle brackets and we have the same result.
So why use Razor at all? Well, in my opinion there are a couple of reasons.
The Razor views tend to end up being very clean and compact with the absolute minimum amount of overhead for writing code in the views. With the default view engine it tends to be an effort to just output a simple variable – with Razor I can just get in there and write exactly what I want. For me, the fact that I don’t have to explicitly end code nuggets (@Model.Name instead of <%:Model.Name%>) makes it a winner.
Having said that, the difference between Razor and the default view engine is not massive. This is actually a benefit in my opinion – this makes it incredibly straightforward to start using Razor with the minimum amount of effort. I will definitely use Razor on the next MVC 3 project I do.
Further reading
Since it’s only been a couple of days since MVC 3 was released there isn’t a wealth of knowledge available, so for the moment I would recommend you take a look at the posts by Scott Guthrie.
- Introducing Razor
- New @model keyword in Razor
- Layouts with Razor
- Server-Side Comments with Razor
- Razor’s @: and
syntax</a> - Implicit and Explicit code nuggets with Razor
- Layouts and Sections with Razor
Happy coding.